The household iron is one of the most common appliances found in nearly every home. Mention the word “iron” and the first image that comes to mind is usually a person carefully pressing shirts, trousers, or sarees to remove wrinkles. While that remains its primary purpose, the heat and steam generated by a modern iron can be put to surprisingly practical use for many other everyday tasks. With proper caution and the right technique, the same iron that keeps your clothes looking sharp can help remove stubborn stains, restore household surfaces, fix minor clothing damage, and even improve the appearance of curtains and carpets.
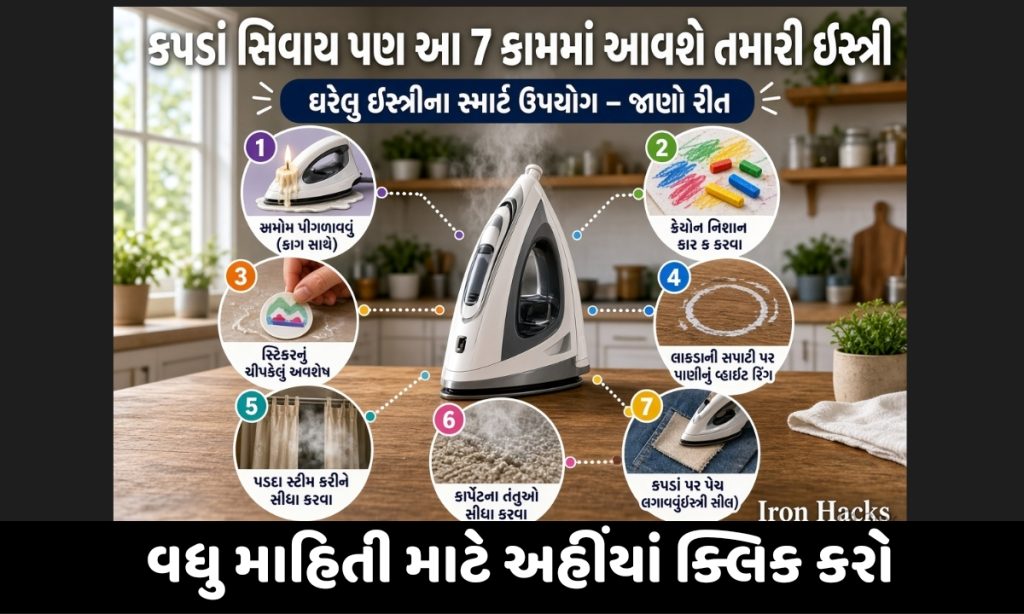
This expanded guide explores seven practical, non-clothing uses of an iron based on widely shared household tips. Each method is explained in detail, including step-by-step instructions, materials needed, temperature recommendations, safety precautions, and common mistakes to avoid. Always remember that heat can damage certain materials, so testing on a small, hidden area first is essential.
Why an Iron Works for More Than Clothes
An iron produces controlled, dry heat (and often steam) that can soften substances such as wax, adhesive residues, and certain dyes or pigments. The combination of heat and light pressure helps transfer or loosen these materials so they can be absorbed or wiped away. Steam, when available, adds moisture that can relax compressed fibers in carpets or fabric. These physical properties make the iron useful far beyond the ironing board—provided temperature settings are adjusted carefully and protective barriers (paper or cloth) are used.
1. Removing Candle Wax Stains from Fabric, Tablecloths, or Carpets
Candle wax is a frequent household nuisance. When it drips onto clothing, tablecloths, or carpet, scraping it while still soft often spreads the stain further. Once the wax cools and hardens, direct rubbing can push it deeper into the fibers.
How the iron helps: Low heat softens the wax so it can be absorbed by a porous material placed on top.
Materials needed:
- Clean brown paper, parchment paper, or a plain white paper towel
- An iron set to low or medium-low heat (no steam if possible)
- A soft cloth for final wiping
Step-by-step method:
- Allow the wax to cool and harden completely. Do not attempt to remove warm, soft wax with heat.
- Gently scrape away any excess solid wax with a dull knife or the edge of a credit card. Work carefully so you do not damage the fabric or carpet fibers.
- Place a sheet of paper or paper towel directly over the remaining wax stain.
- Set the iron to a low temperature suitable for the fabric (check the care label if working on clothing). For carpets or upholstery, start even lower.
- Press the iron gently onto the paper for a few seconds at a time. The heat melts the wax, which is then absorbed by the paper.
- Lift the iron and move to a clean section of the paper. Repeat until no more wax transfers.
- Once the bulk of the wax is removed, treat any residual oily mark with a mild detergent or stain remover appropriate for the material.
Extra tips and cautions: Never use high heat, as it can set the stain or scorch the fabric. Avoid steam during the initial removal stage because moisture can drive the wax deeper. For delicate fabrics such as silk or wool, place an additional thin cloth between the paper and the iron. Test the method on an inconspicuous area first. After treatment, air-dry the item completely before assessing the final result.
This technique is especially useful for tablecloths used during festive occasions or for carpets near candle holders. With patience, most wax stains can be significantly reduced or eliminated without professional cleaning.
2. Eliminating Crayon Marks from Clothes and Surfaces
Children’s crayons contain wax mixed with pigments. When marks appear on clothing, furniture, or walls, the same heat-transfer principle used for candle wax often works.
How the iron helps: Gentle heat softens the crayon wax so it lifts onto absorbent paper.
Materials needed:
- Protective paper or paper towel
- Iron on low heat
- Mild soap or stain remover for residual color
Step-by-step method:
- Scrape off any thick, raised crayon deposits carefully.
- Cover the mark with a clean sheet of paper.
- Apply low heat with the iron in short presses, moving to fresh paper as the wax transfers.
- Continue until the majority of the pigment and wax is absorbed.
- Wash the garment according to its care instructions or wipe the surface with a damp cloth and mild cleaner.
Important precautions: Always test on a small area. High heat can melt synthetic fibers or set the color permanently. For painted walls or finished furniture, this method may not be suitable—consider specialized cleaners instead. Supervise children so they do not attempt the process themselves.
Crayon marks on school uniforms or play clothes respond particularly well to this approach when treated promptly.
3. Softening and Removing Sticky Residue from Old Stickers and Price Tags
After peeling off stickers, price tags, or labels, a sticky adhesive layer often remains. Scraping can scratch surfaces, while solvents may damage finishes.

How the iron helps: Mild heat softens the adhesive, making it easier to wipe or lift away.
Materials needed:
- Thin protective cloth or paper
- Iron on the lowest practical setting
- Soft cloth and mild cleaner (or adhesive remover if needed)
Step-by-step method:
- Never place a hot iron directly on wood, plastic, polished surfaces, or painted finishes.
- Cover the sticky area with a thin cloth or paper.
- Briefly apply low heat while moving the iron continuously. The goal is only to warm the adhesive, not to cook the surface.
- While the residue is soft, gently wipe or roll it away with a cloth.
- Clean any remaining film with a suitable mild product.
Safety notes: Plastic and polished wood are especially vulnerable. Keep the iron moving and use the lowest heat possible. If the adhesive is very old and hardened, a commercial residue remover may be more effective after the heat softens it.
This method is handy for cleaning storage boxes, furniture, or appliances after removing promotional stickers.
4. Reducing White Water Rings and Marks on Wooden Furniture
Wet glasses left on wooden tables frequently leave white circular marks. These marks are often caused by moisture trapped under the finish or by slight clouding of the polish.
How the iron helps: Very gentle heat can help drive out moisture or restore the appearance of certain finishes.
Materials needed:
- Clean, thin cotton cloth
- Iron set to the lowest heat setting
- Optional: a small amount of furniture polish afterward
Step-by-step method:
- Ensure the wood surface is completely dry.
- Place a clean cotton cloth over the white mark.
- Briefly press a low-heat iron onto the cloth for only a second or two at a time. Do not hold the iron in one place.
- Check the mark after each short application. Repeat only if necessary.
- Once improved, apply a suitable furniture polish or conditioner if recommended for the wood type.
Critical warnings: Excessive heat can permanently damage varnish, lacquer, or the wood itself. Never use steam. This technique works best on certain types of water marks and may have limited effect on deep or old stains. When in doubt, consult a furniture professional. Always test in an inconspicuous spot first.
Many households successfully lighten recent water rings this way, restoring the table’s appearance without sanding or refinishing.
5. Steaming Wrinkles from Heavy Curtains While They Hang
Removing heavy curtains for ironing is time-consuming and physically demanding. Steam irons offer a practical alternative for many fabrics.
How the iron helps: Steam relaxes fabric fibers, allowing wrinkles to fall out under the weight of the hanging curtain.
Materials needed:
- Steam iron with vertical steam capability
- Clean water for the reservoir
- Optional: a step stool for higher areas
Step-by-step method:

- Confirm the curtain fabric can tolerate steam (check any care labels).
- Fill the iron with clean water and set it to the appropriate steam setting.
- Hold the iron a short distance from the fabric and release steam in smooth, downward motions.
- Allow the fabric to hang freely so gravity assists in smoothing the material.
- Work section by section from top to bottom.
- Let the curtains dry completely before closing them.
Tips for best results: Natural fibers such as cotton and linen often respond well. Synthetic or delicate fabrics may require lower heat or no direct contact. Avoid soaking the fabric. For very heavy or lined curtains, multiple light passes are better than prolonged steaming in one area.
This approach saves significant time and effort compared with taking curtains down, ironing them flat, and rehanging them.
6. Reviving Flattened Carpet Fibers After Heavy Furniture
Heavy furniture left in one place for long periods compresses carpet pile, leaving visible dents or flattened areas when the furniture is moved.
How the iron helps: Combined moisture and gentle heat can help the fibers regain some of their original loft.
Materials needed:
- Clean cloth or towel
- Iron with steam function (or a spray bottle of water)
- Soft brush or fingers for lifting fibers afterward
Step-by-step method:
- Vacuum the area thoroughly to remove loose dirt.
- Lightly dampen the flattened section with a spray of clean water or by using the iron’s steam.
- Place a clean cloth over the area.
- Briefly apply low heat or steam while moving the iron. Do not press hard or linger.
- While the fibers are warm and slightly moist, gently lift and fluff them with your fingers or a soft brush.
- Allow the carpet to dry completely. A fan can speed drying.
Limitations and cautions: Results vary by carpet type and age. Very old or heavily matted areas may only partially recover. Avoid excessive water that could promote mold or damage the carpet backing. Never use high heat on synthetic carpets.
Many people find this method restores enough loft to make furniture marks far less noticeable.
7. Applying Iron-On Patches for Quick Clothing Repairs
Small holes, worn spots, or minor tears in garments can often be reinforced with iron-on patches.
How the iron helps: Heat activates the adhesive on the patch so it bonds securely to the fabric.
Materials needed:
- Iron-on patch of suitable size and color
- Iron set according to the patch instructions
- Protective cloth if recommended
Step-by-step method:
- Read the manufacturer’s instructions on the patch packaging carefully—temperature and time vary.
- Clean and dry the garment area to be repaired.
- Position the patch over the hole or worn spot, covering it completely.
- Place a protective cloth over the patch if advised.
- Apply firm pressure with the heated iron for the recommended duration.
- Allow the patch to cool completely before testing the bond or wearing the item.
Additional advice: Choose patches designed for the fabric type (denim, cotton, etc.). For best durability, some people reinforce the edges with a few stitches after the adhesive sets. Avoid washing the garment immediately after application; follow the patch instructions for care.
This simple repair extends the life of favorite jeans, school uniforms, or work clothes and is far quicker than traditional sewing for many small damages.
Essential Safety Guidelines for All Iron Hacks
- Always start with the lowest effective temperature and increase only if needed.
- Use a protective barrier (paper or cloth) between the iron and the surface whenever possible.
- Keep the iron moving; never leave it stationary on any surface for more than a second or two.
- Test every technique on a hidden or scrap area first.
- Avoid plastic, synthetic finishes, delicate fabrics, and polished wood unless the method specifically accounts for them.
- Unplug the iron when finished and allow it to cool completely before storing.
- Supervise the process if children are present; never allow them to handle a hot iron.
- Ensure good ventilation when using steam.
- If a surface or fabric is valuable or irreplaceable, consider professional cleaning or repair instead of DIY heat methods.
Expanding the Value of Your Household Iron
Beyond the seven techniques detailed above, an iron can assist with other minor tasks such as sealing plastic snack bags (using low heat and a protective barrier), refreshing slightly damp fabric, or helping certain craft projects that require controlled heat. The key principle remains the same: controlled temperature, protective layers, and patience.

Modern steam irons with precise temperature controls and vertical steam functions expand the range of possible uses compared with older dry irons. Keeping the soleplate clean also improves results and prevents transferring residue to fabrics or surfaces.
Important Links:
| Home page | Click here |
| Join WhatsApp group | Click here |
Frequently Asked Questions (FAQ)
Q1: Can I use these methods on all types of fabric and surfaces?
No. Delicate fabrics (silk, wool, synthetics), plastics, polished wood, and certain finishes can be damaged by heat. Always check care labels and test first.
Q2: What temperature should I use for most of these hacks?
Start at the lowest setting that produces results. For wax and crayon, low to medium-low is typical. For water marks and carpets, the lowest possible heat is safest.
Q3: Is steam necessary?
Steam is helpful for curtains and carpet fibers but is usually avoided when removing wax or sticky residues, as moisture can spread the problem.
Q4: How long does each treatment take?
Most stain-removal methods require only a few minutes of actual ironing time, though preparation and multiple passes add a little more. Curtain steaming and carpet revival may take longer depending on the size of the area.
Q5: Will these techniques completely remove every stain or mark?
Results vary. Fresh wax and crayon marks often lift well. Old, set-in stains or deep water damage may only improve partially. Professional help may still be needed in stubborn cases.
Q6: Can I use a dry iron if I don’t have a steam iron?
Yes for wax, crayon, adhesive, water marks, and patches. Steam is more important for hanging curtains and carpet revival.
Q7: Are there any risks of fire or burns?
As with any iron use, burns and fire risk exist if the appliance is left unattended or placed on flammable materials. Follow standard iron safety rules at all times.
Q8: How should I clean the iron soleplate after these uses?
Once the iron is cool, wipe it with a damp cloth. For residue, use a commercial soleplate cleaner or a paste of baking soda and water (applied carefully when cool), then rinse and dry thoroughly.
Q9: Can these methods be used on upholstery or car interiors?
Proceed with extreme caution. Many upholstery fabrics and car materials are sensitive to heat. Test thoroughly and consider specialized cleaners first.
Q10: Is it better to buy a new iron for these tasks?
Not necessary. Any functional household iron with temperature control can be used. A steam iron simply offers more versatility.
Q11: What should I do if the mark looks worse after trying the method?
Stop immediately. Allow the item to cool and dry, then assess. Further heat is unlikely to help and may cause permanent damage. Seek professional advice if the item is valuable.
Q12: Are there eco-friendly aspects to these hacks?
Yes. Successfully removing stains or repairing items at home reduces the need for replacement products and professional cleaning chemicals, contributing to less waste.
By understanding the principles behind these techniques and applying them carefully, the ordinary household iron becomes a versatile tool for many small domestic challenges. The seven methods described here—wax removal, crayon cleanup, adhesive softening, water-mark reduction, curtain steaming, carpet fiber revival, and iron-on repairs—demonstrate how controlled heat can solve everyday problems efficiently. Always prioritize safety, test first, and respect the limitations of both the iron and the materials being treated. With practice, these practical hacks can save time, money, and effort while extending the usefulness of an appliance most people already own.